A pantry door is an opportunity to bring in some personality to the kitchen.
Here is a simple, affordable way to upgrade a standard 6 panel door.
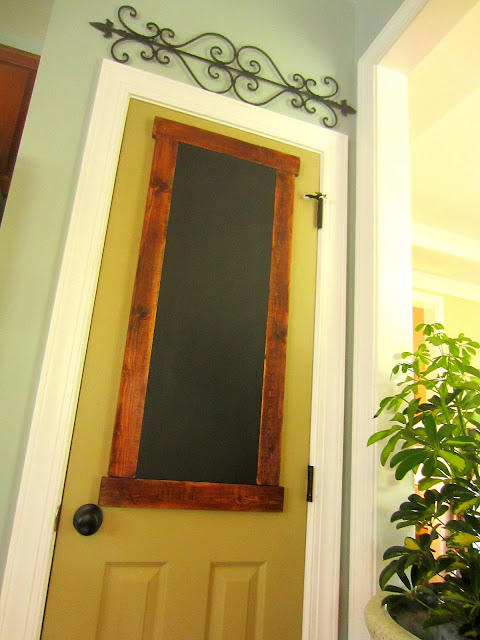
This pantry door measures 24 inches wide.

1- 1x12x48 panel of pine (comes in a sheet at Lowe's for about $15).
(cut to cover the top 4 panels length wise - mine was 36")
2- Trim Molding of 1x3 pine (larger may be needed for a wider door)
(two lengths cut the same as the 1x12 and 2 cut to the length of the 12" and 2- 1x3 frame sides plus 1 inch - mine were cut at 18 inches)
3- Nails (1 1/4 to 1 1/2 inch), Hammer and Liquid Nails if you like.
4- Chalkboard Paint and paint brush or Chalkboard Spray Paint.
5- Stain or paint for the trim and a brush or an old t-shirt.
6- Paint for the door and a brush.
(I chose Northampton Putty by Ben Moore - Really? you say? - it is my favorite)
7-Wood filler
8- 2x cover spray paint in flat black and acrylic sealer spray in clear satin.
(I chose Northampton Putty by Ben Moore - Really? you say? - it is my favorite)
7-Wood filler
8- 2x cover spray paint in flat black and acrylic sealer spray in clear satin.
Cut the wood to size first or have them pre-cut when you purchase it at the lumber store.
There are no miter cuts in this project...
Step 1


Paint the12" middle piece with Chalk Paint (at least two coats).
Step 3


Paint or stain your frame color - I use an old t-shirt and wipe in the stain.
Step 4


Sand the door knob. Spray paint it flat black with wood and metal spray paint.
Step 5
 Paint door covering the over spray from the knob. You will need two coats.
 In between coats wrap your brush in plastic wrap to keep the paint from drying out.
 Tape off hinges to spray them black also. I did mine after the first coat since I would be painting the door again anyway.

 Apply the second coat of paint to the door and the inside side. I use a tiny little brush (up in the left corner of this photo) to paint around the edges of the hardware. (I am not going to worry about the inside of this pantry today so that knob won't match - it will one day.)
Step 7
 Place the chalk board in the middle of the door covering most of the top four center panels. Make sure to use your level to be sure it is straight.
 I use my nail gun and air compressor any time I can - it is so fast and easy. If you don't have one - use your nail, hammer and liquid nails here. You may need somebody to help you hold it in place.
(I am not using liquid nails because this house is not mine - somebody may want to change this one day. If you glue it - it is there for good.)
 Step 8
 Apply your frame. Sides first then top and bottom.
 The top and bottom of the frame should be 1/2 inch over on each side.
Step 9
 Fill in the nail holes with wood filler. Let dry and sand lightly.
 Touch up the paint and your are done!
 I topped mine with an iron accent.

 Now I am one step closer to being ready for school to start. I need a visible place to write myself reminders during the school year.
 This was a simple project that makes my kitchen look a little more "customized".
to see another pantry door post CLICK HERE
to see other ways to bring in character with doors CLICK HERE
and HERE
barn door decor click here
Linking with:
At the Picket Fence
French Country Cottage
Funky Junk Interiors
Funky Junk Interiors SNS #171 Charming Chalkboards
There are no miter cuts in this project...
Step 1

Cut all your wood to size.
Step 2

Paint the12" middle piece with Chalk Paint (at least two coats).
Step 3


Paint or stain your frame color - I use an old t-shirt and wipe in the stain.
Step 4


Sand the door knob. Spray paint it flat black with wood and metal spray paint.
Step 5


I also seal the hinges and knob with this acrylic sealer since this door gets used a lot. It should help the paint last much longer.
Step 6
Step 7


(I am not using liquid nails because this house is not mine - somebody may want to change this one day. If you glue it - it is there for good.)


Step 9


to see another pantry door post CLICK HERE
to see other ways to bring in character with doors CLICK HERE
and HERE
barn door decor click here
Linking with:
At the Picket Fence
French Country Cottage
Funky Junk Interiors
Funky Junk Interiors SNS #171 Charming Chalkboards

0 comments:
Posting Komentar